
Hydro Fix Installation Guide
GENERAL INFORMATION
These installation guidelines apply to Hydro Fix® only. All instructions and recommendations should be followed for a satisfactory installation.
- Hydro Fix flooring should be stored and installed in a climate-controlled location with an average temperature of 55°- 85°F (13°-29°C). `
- Acclimate the material a minimum of 24 to 48 hours prior to installation in the room/location where the installation will take place.
- Hydro Fix comes with an integrated underlayment for walking comfort and acoustic performance. If an additional underlayment for acoustic performance is desired, a minimum underlayment density of 25 pounds per cubic foot must be used to avoid compression and potential joint failure.
- Do not store Hydro Fix directly on concrete and allow for air circulation. Do not open the cartons but spread them out and protect corners from damage
- Failure to follow these guidelines may result in an installation failure (i.e., flooring may expand or contract, resulting in gaps). Hydro Fix flooring is an interior product and must be installed in a temperature controlled environment, maintained at 55°- 85°F (13°-29°C). Please keep in mind a concrete floor can be up to 10 degrees colder than the actual room temperature
- Avoid exposure to direct sunlight for prolonged periods; such exposure may result in discoloration, and excessive temperatures can cause the flooring to expand. During peak sunlight hours, the use of drapes or blinds is recommended.
- Regardless of new construction or remodeling projects, keep flooring stored in rooms that are not being worked in and only install product after all other trades have completed work that could damage the flooring.
- To minimize color variation, mix and install planks from several cartons
- Inspect all planks for damage and sheen variation before installing. If you have any concerns about the product fit or finish, call Lico-US Customer Service at 1-800-434-3750. Claims will not be accepted for flooring that has been cut to size and/or installed.
- All subfloor patching must be done with a Portland-based compound and allowed to dry completely prior to installing flooring.
- This product can be installed on, above or below grade.
- Hydro Fix is water/moisture resistant and reliably secures the flooring panels on all four sides. However, excessive moisture in the subfloor could promote mold, mildew and other moisture-related issues like the trapping of moisture emissions under the flooring, which may contribute to an unhealthy indoor environment.
- Lico-US does not warrant nor is responsible for damage to floor covering due to moisture-related issues.
Tools Needed

SUBFLOOR INFORMATION
Tape measure, utility knife or saw, tapping block, pull bar, 3/8″ spacers, T-square, safety glasses, broom or vacuum.
All subfloors must be clean, flat, dry and structurally sound. The correct preparation of the subfloor is a major part of a successful installation.
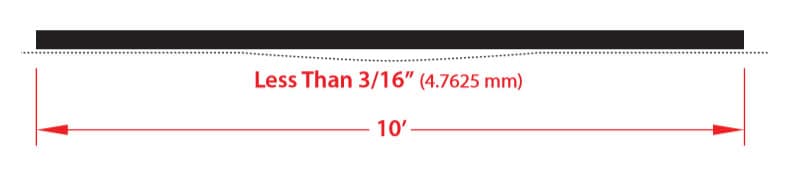
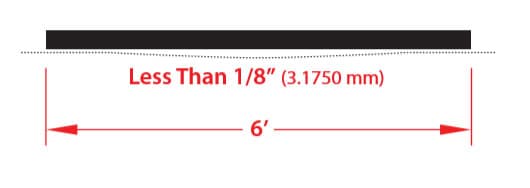
Subfloor must be flat – 3/16″ in 10′ or 1/8″ in 6′.
CAUTION: Solvent-based construction adhesives are known to stain vinyl floor coverings. All responsibility for discoloration problems caused by the use of the above mentioned products is not the responsibility of Lico-US, but rests with the installer. Never use nails or screws to mechanically attach Hydro Fix flooring to a subfloor.
A. Wood Subfloors
- Do not install material over wood subfloors that lay directly on concrete or over dimensional lumber or plywood used over concrete.
- All other subfloors such as plywood, OSB, particleboard, chipboard, wafer board, etc. must be structurally sound and must be installed following their manufacturer’s recommendations. Local building codes may only establish minimum requirements of the flooring system and may not provide adequate rigidity and support for proper installation and performance.
B. Existing Floor Coverings
- Hydro Fix flooring can be installed over most existing hard-surface floor coverings, provided that the existing floor surface is clean, flat, dry and structurally sound.
- Existing sheet vinyl floors should not be heavily cushioned and not exceed more than one layer in thickness. Soft underlayment and soft substrates will diminish Hydro Fix’s inherent strength in resisting indentations and could damage the click system.
- Installation is NOT allowed over any type of carpet.
- Never use solvents or citrus adhesive removers to remove old adhesive residue. Solvent residue left in and on the subfloor may affect the new floor covering.
C. Concrete Subfloors
- New and existing concrete subfloors should meet the guidelines of the latest edition of ASTM F 710, “Standard Practice for Preparing Concrete Floors to Receive Resilient Flooring,” available from the American Society for Testing and Materials, 100 Barr Harbor Drive, West Conshohocken, PA 19428; 610832-9585; https://www.astm.org
- Floors must be smooth, permanently dry, clean and free of all foreign material such as dust, wax, solvents, paint, grease, oils and old adhesive residue. The surface must be hard and dense, and free from powder or flaking.
- New concrete slabs must be dry. Maximum moisture level per CaCl test method is 8 lbs. per 1,000 in 24 hr. Maximum level for ASTM 2170 In-situ Relative Humidity Test method – 85%
- Do not install over concrete with a history of high moisture or hydrostatic conditions.
- The maximum acceptable pH level is 9 or less.
- The final responsibility for determining if the concrete is dry enough for installation of the flooring lies with the floor covering installer.
- Holes, grooves, expansion joints and other depressions must be filled with a Portland-based patching and leveling product, and troweled smooth and feathered even with the surrounding surface. Our products can “bridge” slightly uneven surfaces (up to 1/16-inch in three (3) feet). Hydro Fix can be installed over existing tile floors if the grout lines are less than 3/8-inch wide.
- In an environment where moisture is a concern, a 6 mil Polyethylene Moisture Block Film Vapor Barrier can be installed prior to installation.
Radiant Heat
Radiant heat components must have a minimum of 1/2″ separation from the product. This is the only type of radiant heat system that is approved. The radiant heat system must be on and operational for at least 2 weeks prior to installation to reduce residual moisture within the concrete. The maximum temperature for a radiant heat system is 82°F and only systems based on hot water (no electrical heating elements) are suitable.
Three days prior to installation, lower the temperature to 65°F. After installation, gradually increase the temperature in increments of 5°F to avoid overheating. Maximum operating temperature should never exceed 85°F. Use of an in-floor temperature sensor is recommended to avoid overheating.
WARNING! DO NOT SAND, DRY SWEEP, DRY SCRAPE, DRILL, SAW, BEADBLAST OR MECHANICALLY CHIP OR PULVERIZE EXISTING RESILIENT FLOORING, BACKING, LINING FELT, ASPHALTIC “CUTBACK” ADHESIVES OR OTHER ADHESIVES. These products may contain either asbestos fibers and/or crystalline silica. Avoid creating dust. Inhalation of such dust is a cancer and respiratory tract hazard. Smoking by individuals exposed to asbestos fibers greatly increases the risk of serious bodily harm. Unless positively certain that the product is a non-asbestos containing material, you must presume it contains asbestos. Regulations may require that the material be tested to determine asbestos content and may govern the removal and disposal of material. See current edition of the Resilient Floor Covering Institute (RFCI) publication. Recommended Work Practices for Removal of Resilient Floor Coverings for detailed information and instructions on removing all resilient covering structures. For current information go to www.rfci.com
INSTALLATION
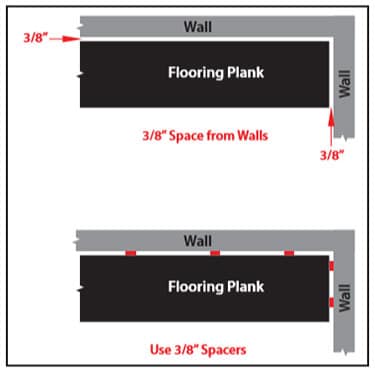
Hydro Fix plank flooring is designed to be installed utilizing the floating method only. Never secure the planks to the subfloor using nails or screws. Do not install cabinets or fixed, heavy objects on top of the flooring. Proper perimeter expansion space of 3/8inch is required in all spaces over 1,000 square feet. Expansion joints also required in doorways if adjoining space also uses Hydro Fix flooring and the total square footage exceeds 1,000 feet. Undercut all doorjambs, door stop and door trim, allowing flooring to slide underneath. Do not fasten wall moldings and/or transition strips to the planks.
- Before you start with the installation, it is important to determine the layout of the flooring. Proper planning and layout will prevent having narrow plank widths at wall junctures or very short length pieces at the end of rows.
- As with all plank products, install the planks parallel to the longest exterior wall.
- Determine if the starter row will need to be cut. If the first row of planks does not need to be trimmed in width, it will be necessary to cut off the unsupported tongue so that a clean, solid edge shows toward the wall.
- Installation of the product must start from the right side of the room, working to the right when working in front of the planks or facing the starting wall.
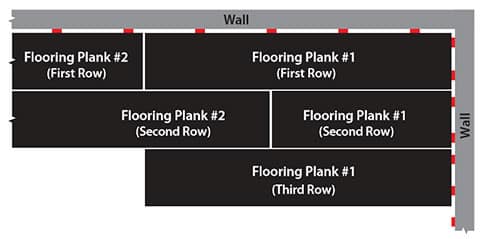
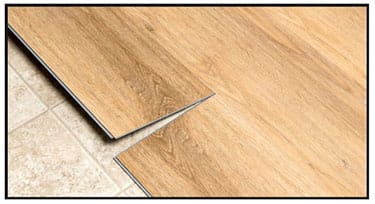
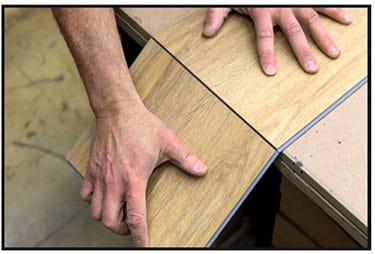
- Install the second plank in the row by angling the end tongue into the end groove of the first plank. Be careful not to bend the corner of the plank. Maintain an expansion gap of approximately 3/8″ from the wall. Use 3/8-inch spacers if necessary. Start the second row by cutting a plank to the desired length. Keep in mind that the plank must not be shorter than 6″ to achieve the best appearance.
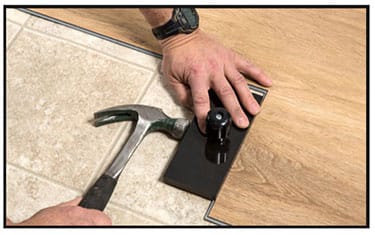
- Insert the long side first and then “snap” the short side by using a hammer and a tapping block. The tapping block must be approximately 8″ long and must be positioned above the lip of the click system (in order not to damage it).
- Work across the length of the room installing planks along the wall in the first row and then align the planks in the second row. It is critical to keep these two rows straight and square, as they are the “foundation” for the rest of the installation. Check squareness and straightness often.
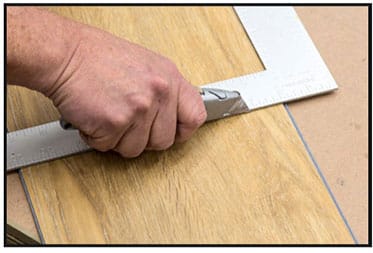
- Cut the last plank in the first row and leave an expansion gap of around 3/8″. Planks may be cut with a saw. Or use a utility knife using the “score and snap” technique. The leftover of this plank may be used to start the third row if it’s a minimum 6″ long.
- Continue installing planks and make sure to achieve a random appearance with end pieces of minimum 6″. Check that all planks are fully engaged; if a slight gap is found, the gap can be tapped together by using a tapping block and a scrap of flooring to cover the tapping block in order to avoid damages on the planks.
- When fitting under door casings, etc., the flexibility and convenient connection of Hydro Fix becomes evident. If necessary, a flat pull bar may be used to assist in locking the planks.
- When fitting around obstacles or into irregular spaces, planks can be cut with a jigsaw. It is often beneficial to make a cardboard template of the area and transfer this pattern to the plank.
- Protect all exposed edges of the flooring by installing wall molding and/or transition strips. Make sure that no plank will be secured in any way to the sub floor.
REPAIRS
Hydro Fix plank flooring is tough and durable; however, if a plank becomes damaged, it can be replaced. If the damaged plank is along the perimeter of the room, the easiest technique is to disconnect the planks until the damaged plank is removed. Replace the plank and reassemble the planks. If the damaged plank is not along the room’s perimeter and must be replaced, a professional flooring installer should be called to make the repair.